Author

momfad_com

This strawberry rhubarb bread with a cinnamon-sugar topping is one of my top sweet treats for spring and summer. The juicy strawberries balance the tart rhubarb perfectly, and the cinnamon streusel ties it all together for a dessert everyone will enjoy.

I love eating fresh fruit and produce in the warmer months. My parents always had a garden, so I grew up around homegrown fruits and vegetables and picked up a few gardening habits along the way. This year our garden was smaller because of home construction, but we still kept a few plants going.

Strawberry-Rhubarb Loaf with Cinnamon-Sugar Streusel

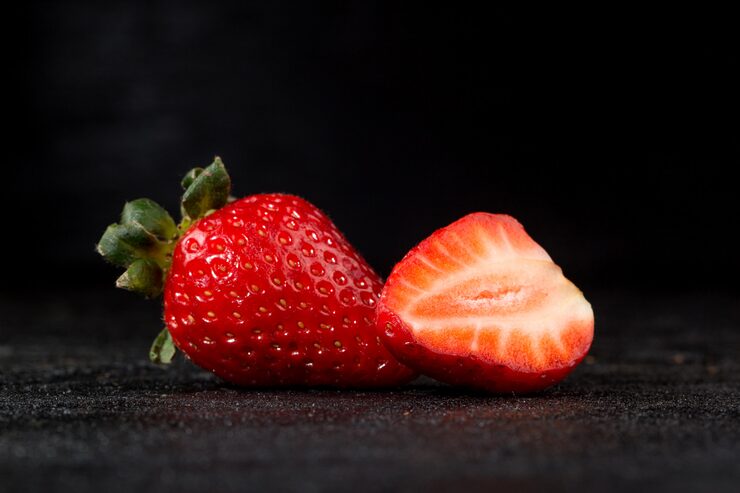
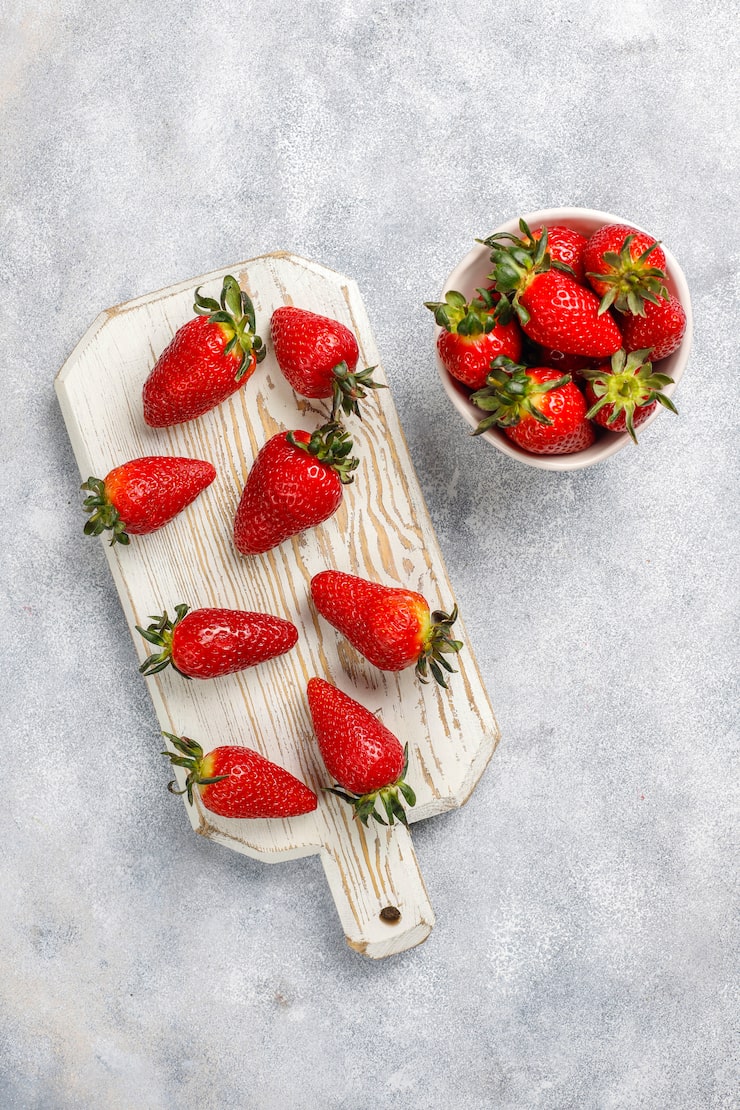
Rhubarb is one of the things we look forward to most each spring and summer. It has big, beautiful leaves and bright pink stalks, and a very tart flavor that’s great for pies, crumbles, jams, and sauces. I especially like pairing rhubarb with sweet strawberries — their sweetness complements the rhubarb’s tartness, and both are in season at the same time.

One of my favorite things to bake in spring and summer is this strawberry rhubarb quick bread. Sweet strawberries and tangy rhubarb bake together in a cinnamon-sweet loaf that’s delicious warm, especially with a scoop of vanilla ice cream. The cinnamon-sugar topping is the perfect finishing touch.

I enjoy cooking from scratch, but I also appreciate shortcuts. This recipe is quick and easy thanks to a boxed muffin or cake mix. I use a vanilla muffin mix to speed things up, which is helpful when little helpers want to join in.

Tips for using muffin mix to make quick bread:
– Bake at a lower temperature for longer. A good rule is to reduce the oven temperature by 25ºF.
– Make sure you have enough batter: choose a mix that makes at least 12 muffins. Fill the loaf pan within 1–2 inches of the top. If you’re worried about overflow, place a baking sheet underneath.
I’ve included the adjusted temperature and time below, so you don’t need to make any other changes.

Strawberry Rhubarb Bread With Cinnamon Sugar Topping

PREP TIME: 5 minutes
COOK TIME: 50 minutes
TOTAL TIME: 55 minutes
YIELD: 1 loaf

Ingredients
Bread
– 1/2 cup rhubarb, chopped
– 1/2 cup strawberries, chopped
– 1 package vanilla muffin mix
– 1/4 cup flour

Cinnamon Sugar Streusel
– 1/3 cup sugar
– 1/4 cup flour
– 1 teaspoon cinnamon
– 1/4 teaspoon salt
– 2 tablespoons unsalted butter, room temperature

Instructions
1. Preheat oven to 375°F. Grease a loaf pan.
2. Prepare the muffin mix according to the package directions (use the amounts listed for oil, water, and eggs) in a large bowl.
3. In a separate bowl, toss the chopped rhubarb and strawberries with 1/4 cup flour to coat. This helps keep the fruit from sinking.
4. Fold the fruit into the batter and pour the batter into the prepared loaf pan.
5. In a small bowl, mix the streusel ingredients with a fork until crumbly.
6. Sprinkle the cinnamon-sugar streusel evenly over the batter.
7. Bake 50–60 minutes, or until a toothpick inserted in the center comes out clean. Let cool, slice, and enjoy.

To enjoy rhubarb year-round, you can freeze it for later use.

How to Freeze Rhubarb
Rhubarb has a short growing season, so freezing it is an easy way to save some for later. Wash and dry the stalks, cut them into 1-inch pieces, place them in an airtight freezer bag, and freeze. They’ll keep for up to a year.

Spread the love — 21 Shares

This post is sponsored by Burt’s Bees. All thoughts and opinions are my own.

Cold temps, strong winds, and nonstop heat are a recipe for dry skin and chapped lips. As the weather cools, protecting your skin—especially your lips—should be a priority to avoid dryness, cracking, and pain. Lip skin is very thin and has far fewer oil glands than the rest of your face, so it’s extra prone to drying out. Add cold air, indoor heating that strips moisture, and blustery winds, and you’ve got the perfect setup for sore, chapped lips.

Winter Lip Care: How to Prevent Dry, Chapped Lips

Cold Weather Lip Care Tips to Prevent Dry, Chapped Lips

Use a natural lip butter often
Choose lip products with rich, moisturizing ingredients. A lip butter helps lock in moisture, shields your lips from cold, dry air, and keeps them hydrated throughout the day. I love Burt’s Bees Lip Butters—they’re made with 100% responsibly sourced shea and cocoa butter plus other natural ingredients. They’re ultra-creamy, all-natural, and create a protective barrier while keeping lips soft. The botanical blends (Vanilla Clove, Lavender & Honey, Orange & Pistachio, Rosemary & Lemon) go on smooth with a light sheen, so they’re great for everyday wear and work well under or over lipstick.

I stock several so I can reach for one all day long—one in my purse, one in the car, one at my desk, and one by my bed. Natural ingredients matter to me; I don’t want to worry about using—or accidentally ingesting—anything questionable.

You can find Burt’s Bees Lip Butters at Ulta Beauty or Ulta.com.

Drink more water
Hydrate from the inside out. Drinking water throughout the day helps keep your lips and skin hydrated.

Stop lip licking
If you catch yourself licking your lips, try to stop. Licking dries them out even more. Keep a lip butter handy and apply it when the urge to lick hits.

Keep skin covered
Protect your lips and face from the elements. Zip up your coat and use a scarf over your mouth when you’re outside to block cold, drying air.

Use a humidifier
Heaters pull moisture from the air. A humidifier adds humidity back into your home and helps prevent dry skin. If you have young children, use cool-mist humidifiers for safety.

Check ingredients in your products
I prefer natural products and avoid ingredients that can irritate. Look for lip balms with hydrating butters—Burt’s Bees Lip Butters use shea and cocoa butter to help lock in moisture, heal dry lips, and protect them. Some people react to sunscreens, so that’s worth noting (Burt’s Bees Lip Butters are sunscreen-free). The small win: the jars are easy to open and fully recyclable.

Scrub away dead skin (but don’t pick)
Avoid picking at flaky lips—picking makes things worse and can cause cracks or scabs. For gentle maintenance, use a sugar scrub to exfoliate. Mix sugar, coconut oil, and honey into a paste, rub gently on your lips to remove dead skin, then rinse. Follow up with Burt’s Bees Lip Butter to seal in moisture.

Give your lips TLC every night
Make applying lip butter part of your nighttime routine. Using it before bed gives lips extra moisture while you sleep—especially helpful if you breathe through your mouth. The Lavender & Honey flavor is especially calming at night. Apply before bed and wake up to softer, more hydrated lips.

Which botanical flavor of Burt’s Bees Lip Butter would you pick?
– Limited Edition Vanilla Clove
– Lavender & Honey
– Orange & Pistachio
– Rosemary & Lemon

Related Posts
– 6 Cute and Easy Hat Hairstyles — Read More
– DIY Moisturizing Honey Face Mask for Glowing, Hydrated Skin — Read More
– Botox 101 (Including Before and After Botox Photos) — Read More

Load more posts

Spread the love
3 Shares

There’s nothing like hitting the road with your crew for sun, adventure, and a break from the daily grind. We recently took the family to sunny Florida, and it was exactly what we needed—full of great memories. From the wild Everglades to snorkeling in the Keys, every moment was unforgettable. Best of all, we did it all in the stylish, super-safe Mazda CX-90.

🐊 Everglades Alligator Farm: A Wild Adventure
One of our first stops was the Everglades Alligator Farm, the oldest alligator farm in South Florida. Home to over 2,000 alligators, the farm offers thrilling airboat rides that bring you up close to this unique ecosystem. The ride is fast, loud, and packed with adrenaline—those 360° turns had us laughing (and a little wet), but the views were worth it. The kids loved the alligator shows and even got to hold a baby gator. It was both educational and exciting for the whole family.
The farm also rescues and cares for nuisance alligators that would otherwise be removed from the wild, which made the visit feel meaningful as well as fun. Highly recommend if you want adventure, wildlife, and lasting memories.

Sun, Gators & Coastal Adventures: Our Family Road Trip in the Mazda CX-90

🌊 Silent World Dive Center: Snorkeling in Paradise
We went to Key Largo to snorkel with Silent World Dive Center—our first time, and it was amazing. We boarded their 51-foot snorkel-only boat and explored North America’s only living coral barrier reef. The water was crystal clear and the marine life was stunning: colorful fish, coral, conches, barracudas, jellyfish, and even a shark. We also saw the famous Christ of the Abyss statue. Snorkeling is a little of a learning curve, but once you settle in it’s calm and magical. The kids did great, so it’s a fantastic option for adventurous families. The staff were friendly and knowledgeable, and they provided reef-safe sunscreen to protect the ecosystem.
If you get motion sick, take Dramamine—the captain said to take it 24 hours before for best effect. I felt a bit queasy at times, but I’m sensitive and it was totally worth it.

🏖️ Hollywood Beach: Sun, Sand, and Boardwalk Strolls
We wrapped up the trip at Hollywood Beach, where the palm-lined Boardwalk had that old-school Florida charm. We strolled the beach, people-watched, listened to live music, enjoyed beachside food, and let the kids run wild on the soft, white sand. It was the perfect mix of chill time and activities.

🚗 Mazda CX-90: The Ultimate Family Travel Companion
Our trip MVP was the Mazda CX-90. As a mom, I need a car that makes life easier, and this one did just that. It earned the 2024 Top Safety Pick, which gave me peace of mind driving in busy areas and unfamiliar places.

Family-Friendly Features We Loved:
– Seating for up to 8: Plenty of room for family, cooler bags, and beach gear (yes, even the pool noodles).
– Third-row access that’s actually easy: Getting kids in and out was a breeze—no gymnastics required.
– Rear-seat USB ports: Kept the kids charged and entertained on the road.
– Hands-free power liftgate: A lifesaver when your hands are full of snacks, towels, and flip-flops.
– Quiet cabin: Road noise was minimal, so the ride felt calmer for everyone.

Advanced Safety That Had My Back:
Mazda’s i-Activsense® suite includes:
– Adaptive cruise control
– Lane-keep assist
– Blind spot monitoring
– Smart brake support
These features gave me real peace of mind, especially on highways and unfamiliar routes. The plug-in hybrid option is also a win for fuel efficiency and the environment—something our family is trying to be more mindful about.

Final Thoughts
Florida gave us sunshine, wildlife encounters, ocean adventures, and so many sweet memories. If you want a stylish, safe, and family-friendly ride for your next trip, the Mazda CX-90 is totally worth the hype.
Check out more about the family-focused features of the CX-90 here: Mazda Family Car Features
Share the love

The holidays are here, and I’m sharing some of my favorite women’s gift ideas from adidas. Whether you’re shopping for a yoga lover, runner, gym-goer, or someone who loves athleisure, these picks should help. Here are a few adidas items I expect will be big hits this season.

Superstar Shoes
I love adidas running shoes, but I also have a soft spot for the Superstar. With lots of color options, they’re the go-to casual sporty sneaker for streetwear and beyond. I like them with jeans or a casual dress for a day out, or even to wear to yoga. They have a leather upper and a rubber outsole, so they hold up better in cool or wet weather than many suede styles. Shop here.

5 adidas Gifts for Every Woman Who Loves Fitness

Tracksuits
You can’t go wrong with a classic tracksuit. With so many colors and cuts—from wide leg to slim and the traditional fit—there’s a tracksuit for everyone. The new glam pants are my favorite, and that purple shade is gorgeous. They’re perfect for staying cozy when it’s chilly. Buy here.

Hoodies
I’ve added so many hoodies to my wishlist that picking one favorite is tough. A soft, cozy hoodie is always a safe gift. One I reach for often is the Essentials 3-Stripes Zip-Up Hoodie. It comes in lots of colors, has a flattering cut, and is a wardrobe staple. Buy here.
Another favorite is the Essentials Big Logo Regular Fleece Hoodie. It’s ultra-soft, warm, and just the right weight. It pairs well with leggings or skinny jeans for a relaxed, casual look.

Long Line Bra Tank Top
The longline bra tank is a top pick. It offers medium support, a seamless fit, and a built-in bra—ideal for yoga and pilates fans. The fabric is buttery soft and very comfortable. Wear it with leggings for class or under a tracksuit jacket for a sporty, put-together look.

Velvet Puffer Jacket
I’m obsessed with this velvet puffer. The color, the material, the fit—it has everything. The large collar is great for keeping warm on cold, blustery days.

Spread the love

Attention fourth graders and their families! Explore America’s parks and historic sites for FREE with the Every Kid Outdoors program. Run by the U.S. Department of the Interior, this program gives fourth graders a year-long free pass to hundreds of national parks, wildlife refuges, forests, and more.

What is Every Kid Outdoors?
Launched in 2015, Every Kid Outdoors helps kids connect with nature by offering free access to federal parks and public lands. Every U.S. fourth grader can get a free annual pass, so they and their families can explore the natural and historic places the country has to offer.

Claim Free National Park Passes — Explore America with the Every Kid Outdoors Pass

Why fourth grade?
Research shows that around age ten—usually fourth grade—kids are at a great age to form lasting bonds with nature. They can understand and appreciate the outdoors and are likely to carry those experiences with them. The program promotes physical activity and encourages kids to care about conservation.

How it works:
Who’s eligible:
Any U.S. student in fourth grade, including homeschooled and other nontraditional learners. Fourth graders visit the Every Kid Outdoors website, complete a short, fun activity, and receive a printable voucher for their free annual pass.

Getting your pass:
Go to the Every Kid Outdoors website, finish the activity, and print your voucher. Use it at more than 2,000 federal sites—national parks, forests, wildlife refuges, and more—many of which offer kid-friendly programs and guided tours.

Using your pass:
Show the pass to a park ranger at sites that charge entrance fees. The pass is valid for the full fourth-grade year: September 1 through August 31.

Who the pass covers:
– The fourth grader
– Up to three accompanying adults (great for parents, grandparents, or other caregivers)
– All children under 16 in the group

Imagine the possibilities: hike among California’s redwoods, kayak in the Everglades, or climb sand dunes in Indiana. The pass opens the door to countless outdoor adventures.

Make the most of your year:
Start local: Visit nearby parks first to build confidence and plan longer trips later.
Plan a road trip: Search parks by state or region on the Every Kid Outdoors site and pick places that fit your family’s interests.
Become a Junior Ranger: Many parks offer Junior Ranger programs with activity booklets that teach about wildlife, geology, and history—and often include a badge or certificate.
Try citizen science: Some parks let visitors help with research projects, like counting birds or monitoring water quality—a fun way to learn and give back.

Tips for safe, fun trips:
– Pack essentials: sunscreen, bug spray, sturdy shoes, weather-appropriate clothing, snacks, water, and a basic first-aid kit.
– Leave no trace: carry out all trash and follow park rules to keep places beautiful.
– Record memories: take photos, keep a journal, or collect small items with permission.

The Every Kid Outdoors program is a chance to spark a lifelong love of nature and make lasting family memories. Grab your pass, pack your bags, and enjoy a year of exploration!

Share the news.

This post is sponsored by NOW Foods. All thoughts and opinions are my own.

We don’t do boring salads here. A salad doesn’t have to be a forgettable side — with a little extra care and the right add-ins, it can become a beautiful, nutritious, and crave-worthy meal. Taking a few minutes to prep tasty toppings and make a simple homemade dressing is always worth it.

Chicken and Berry Salad with Strawberry-Basil Vinaigrette

This berry chicken salad is one of my favorite summer meals. It’s full of bright flavors but easy to pull together, and people tend to love it. Garlicky grilled chicken, fresh spinach and crunchy romaine, sweet strawberries, red onion, toasted nuts, and feta make a great mix of flavors and textures. The star, though, is the homemade strawberry basil vinaigrette.

Fresh, homemade dressing gives a salad that extra layer of deliciousness that keeps you coming back. This strawberry basil vinaigrette is quick to make and uses just a few ingredients. I’m always looking for ways to use up basil when it’s abundant (I like to make pesto too), and fresh basil brings a perfect summer note to this dressing. Add extra virgin olive oil, red wine vinegar, honey, strawberries, and a bit of spice, and you’re set.

Many store-bought dressings are full of refined sugars and additives, so I prefer making my own. This recipe isn’t sugar-free, but it uses healthier choices. Homemade dressings sound fancy but are actually simple. I usually use extra virgin olive oil for dressings (unless I’m making something with an Asian twist, where I reach for sesame oil).

I keep NOW Foods Organic Extra Virgin Olive Oil on hand because it has a smooth, balanced flavor that works well in dressings, marinades, and for cooking. NOW uses strong testing and quality checks so you know you’re getting true olive oil, not something watered down with cheaper oils. Olive oil is also linked to heart-healthy benefits: limited but suggestive evidence shows about 2 tablespoons a day may lower coronary heart disease risk thanks to monounsaturated fats. A daily serving is an easy, tasty way to support heart health.

For the dressing, just add everything to a blender, pulse, and you’re done. I chose red wine vinegar because it’s milder than balsamic and lets the strawberries shine. Creamy Manuka honey adds the right sweetness, garlic gives a little depth, and fresh basil ties it all together.

A generous drizzle of this dressing over greens and grilled chicken just says summer. It’s a perfect patio dinner for the last warm days. Add whatever veggies you like (I love cherry tomatoes when I have them), but red onion pairs especially well with the sweet-tangy dressing. Feta and toasted nuts finish it off — pecans are my go-to, and you can even use candied nuts like NOW honey roasted pecans (a family favorite).

Strawberry Basil Vinaigrette
Prep time: 5 minutes
Total time: 5 minutes
Yields: 1 cup dressing

Ingredients — Strawberry Basil Vinaigrette
1 cup strawberries, tops removed
1/4 cup extra virgin olive oil
3 Tbsp red wine vinegar
1/2–1 Tbsp honey
Large handful basil
1 clove garlic
Salt and pepper to taste

Berry Chicken Salad
Grilled chicken (I like a roasted garlic seasoning)
Mixed greens: spinach and romaine
Strawberries, hulled and sliced
Sliced red onion
Diced cucumber
Feta cheese
Toasted pecans (NOW honey roasted pecans are great)

Instructions
1. Add all vinaigrette ingredients to a blender and blend until smooth.
2. Assemble your salad and drizzle with the dressing.

Do you like fruit on your salad?

Spread the love
368 Shares

Wallpaper is an easy way to add personality, style, and visual interest to a room. When it was time to decorate our oldest child’s bedroom, I wanted a bold, fun forest mural. We’d used Photowall murals before in our living room and loved the quality and final look, so I chose them again. Their directions are clear, you can customize size and orientation to your wall, and they have tons of designs. You can even order sample pieces to try before you commit, which is really helpful.

For our son’s room we picked Foggy Forest (available in several colorways). It’s a moody but not-too-dark image of a dense forest—perfect for creating a calm space he’ll enjoy for years. He’s 9 now, so we wanted something that would transition well into his pre-teen years. As a nature-loving kid, this mural fits him perfectly.

Transform a Room with Wallpaper

If you’re thinking about using wallpaper, these steps will help:

1. Plan and visualize
Decide the overall look and mood you want. Browse patterns and colors for inspiration, and gather samples or make a mood board to see how the wallpaper will work with your furniture and decor.

2. Measure the walls
Measure each wall you’ll cover so you know how much wallpaper to buy. Include doors, windows, and any features that affect the size.

3. Prepare the room
Take down old wallpaper, clean the walls, and fix cracks or holes. Sand any rough spots and make sure walls are dry and smooth before you start.

4. Gather supplies
Buy the right amount of wallpaper and the proper adhesive (unless it’s pre-pasted). You’ll also need a smoothing brush or squeegee, a sharp knife or scissors, a tape measure, and a plumb line or level. Photowall includes supplies and adhesive with their murals, which is handy.

5. Start from the left
Begin on the left side of the wall and use a plumb line or level so the first strip is straight. Apply adhesive to the wall if needed and start hanging the first strip.

6. Hang the wallpaper
Line up the first strip with the plumb line and smooth from top to bottom to remove bubbles. Trim excess along the ceiling, baseboards, and corners with a knife or scissors.

7. Continue with each strip
Match the pattern and edges as you go. Apply adhesive where needed and smooth each strip carefully for a seamless look.

8. Finishing touches
Check for air bubbles or small flaws and smooth them out. Use a damp sponge to clean off any excess paste.

9. Enjoy your transformed room
Let the wallpaper dry fully before moving furniture back or adding decor. Then step back and enjoy the new look.

We still have more decorating to do in his room, but the mural already makes a big impact. It was easy to install and gives the room a real “wow” factor. Once we add new bedding, lighting, and a few decor pieces, the space will feel complete.

Be patient and pay attention to the details—installing wallpaper can seem intimidating, but it’s a very doable DIY. I highly recommend Photowall: they make the process simple, offer thousands of designs, and their wallpaper is high-quality and durable.

Spread the love

This post is sponsored by NOW Foods. All opinions are my own.

These sweet, chewy no‑bake strawberry shortcake almond bites are seriously delicious. They’re vegan, made without refined sugars or oils, and make a healthier sweet treat. Think bright strawberry flavor, a hint of almond, and a chocolate coating for extra indulgence.

No-Bake Strawberry Shortcake–Flavored Almond Bites

We love energy bites at our house. Whether made with oats for a crumbly texture or with ingredients like almond flour and nut butter, they’re easy, nutrient-dense, and—most importantly—tasty. I like changing flavors with the seasons, and these strawberry shortcake bites are a perfect springtime pick that everyone in the family will enjoy.

These no‑bake bites remind me of a cross between strawberry shortcake and a PB&J—except better, because they’re topped in milk chocolate. One of the best things about this recipe is the short ingredient list: only nine items, most likely already in your pantry. The other great part is how simple they are to make. The hardest step? Waiting for them to freeze!

How to make
Start by preparing the shortcake-style base. It has a buttery, slightly nutty flavor and a cookie-dough texture. The base is made with NOW almond flour (I like the superfine for this) and a nut butter of your choice. Almond butter gives the most shortcake-like flavor; swap in peanut butter if you prefer a PB&J vibe. Mix the dry ingredients first. I add a scoop of NOW vanilla protein powder for extra protein (they have a plant-based option), but you can skip it—just add more almond flour if you do.

I use maple syrup to sweeten naturally. I try to limit refined sugar, and maple syrup adds a gentle sweetness and nice flavor. I buy NOW Foods organic grade A maple syrup because its lighter taste works well in recipes and the large size is a good value.

Aim for a cookie-dough consistency for the dough. When adding milk, start with 1 tablespoon. If the mixture is too thin, add a tablespoon of almond flour. If it’s too thick, add another tablespoon of milk until it’s just right.

Press half the dough into a parchment-lined loaf pan, breaking it into pieces so the jam can swirl through the bites. Spread the jam over that layer, then add the remaining dough on top and press firmly into an even layer. Freeze for 2–3 hours; the longer they freeze, the easier they are to cut and coat in chocolate.

For the chocolate coating, melt milk chocolate chips with a bit of coconut oil. The coconut oil helps the chocolate melt smoothly and makes dipping easier (like a magic shell). A double boiler is ideal, but if you use the microwave, heat at 50% power in 10-second bursts and stir often to avoid burning.

Dipping the bites in chocolate helps hold them together and pairs perfectly with strawberries. After dipping, place them back on parchment and let the chocolate set. Sprinkle a little sea salt on top if you like.

Substitutes & options
– Nut butter: Use what you like—almond, peanut, cashew, or sunflower seed butter will all work, though each changes the flavor.
– Jam: Any jam works. Raspberry or homemade jam would be delicious alternatives.
– No protein powder: Leave it out and replace the same amount with almond flour.
– No chocolate: You can skip the chocolate coating, though the bites will be a bit messier without it.

No Bake Strawberry Shortcake Almond Bites
These sweet, chewy no‑bake strawberry shortcake almond bites are vegan, free of refined sugars and oils, and a perfect healthier treat. They balance strawberry flavor, subtle almond notes, and a chocolate finish.

SERVINGS
About 15 bites

INGREDIENTS
– 1 cup strawberry jam
– 1 1/4 cups almond flour
– 6 Tbsp vanilla protein powder
– 1/4 tsp salt
– 1/4 cup maple syrup
– 1/4 cup almond butter
– 1–2 Tbsp milk
– 1 cup chocolate chips
– 1 Tbsp coconut oil

INSTRUCTIONS
1. Line a loaf pan with parchment paper.
2. In a medium bowl, mix almond flour, vanilla protein powder, and salt.
3. Add maple syrup, nut butter, and 1 tablespoon of milk to the dry mix. Stir until the mixture has a cookie-dough texture. If too dry, add another tablespoon of milk; if too wet, add almond flour a tablespoon at a time.
4. Press half the dough into the prepared pan.
5. Spread the jam evenly over the dough with a spatula.
6. Add the remaining dough on top and press firmly into an even layer.
7. Freeze for 2–3 hours (the longer, the better for cutting and coating).
8. Lift the chilled block out of the pan using the parchment edges and cut into bite-sized pieces.
9. Melt chocolate chips with coconut oil in a double boiler or microwave (50% power, stirring every 10 seconds). Stir until smooth.
10. Dip each bite in chocolate, place on parchment, and let the chocolate harden.

NOTES
– Store in the refrigerator for up to 7 days or freeze for up to 3 months.

FAVORITE TOOLS & DISCOUNT
Save 20% on all nowfoods.com orders with code AMBER. I love their pantry staples (many gluten-free options), essential oils, and supplements. A few helpful tools for making these bites: a loaf pan lined with parchment, a good spatula, and a small scoop for shaping bites.

MORE ENERGY BITES
– Peanut Butter & Chocolate Chip Protein Bars
– No Bake Lemon Coconut Energy Bites
– Pumpkin Spice Oatmeal Energy Balls
– Chocolate Coconut Prune Energy Balls (Paleo approved)

Spread the love
11 Shares

This post is sponsored by NOW®. All opinions are my own.
Are frequent hand-washes leaving your hands, nails, and cuticles dry or cracked? I’m sharing some of my favorite creams and lotions, plus an easy DIY cuticle oil to help nourish, moisturize, and protect your hands. This nail and cuticle oil blends oils and extracts for a deeply moisturizing treatment.
Can we all take a collective deep breath? Phew.
These past few weeks have been stressful and overwhelming. With this pandemic upending our routines, we’ve been doing our best at home to stay healthy: social distancing, eating well, supporting our immune systems (see my post: 6 Natural Ways to Optimize Your Immune System), staying active, getting fresh air, and most importantly—washing our hands constantly.
All that hand-washing (and singing the ABCs to hit 20 seconds) can leave skin dry or even cracked. Frequent washing strips the skin of its natural oils, causing dryness, itchiness, and irritation on hands, cuticles, and nails. Besides being uncomfortable, hangnails and cracked skin can become openings for bacteria and infection—something we definitely want to avoid.
Because hand-washing removes natural oils, it’s important to moisturize often. The best time is right after washing your hands. Keep a soothing, oil-based cream or lotion by the sink so you can apply immediately (it’s best to leave hands slightly damp). I like NOW® Solutions Shea Butter Lotion for intense moisture, or NOW® Solutions Vitamin E Cream to help restore the skin’s natural moisture. The shea butter lotion contains 10% shea butter for rich hydration, and soy lecithin’s phospholipids help reduce moisture loss and boost shea butter’s effects.
I tend to get split nails and ragged cuticles—add stress and a bad hangnail-picking habit, and my nails were a wreck. Adding this moisturizing cuticle and nail oil to my routine made a big difference, giving intense relief and hydration to my dry, damaged hands. Below is one of my favorite DIY cuticle oil recipes that soothes and restores dry, cracked cuticles and nails. It’s packed with nourishing oils that help keep skin, nails, and cuticles soft and healthy.
This nail and cuticle oil uses several skin-loving oils to keep hands looking healthy, moisturized, and smooth. While each oil works alone, I like combining them for the best results.
Argan Oil
Rich in vitamin E and fatty acids, argan oil boosts moisturization. It absorbs quickly without feeling greasy, helps maintain healthy skin pH, and soothes and protects skin. Bonus: a few drops rubbed into palms also add shine and tame flyaways in hair.
Vitamin E
Vitamin E is moisturizing and helps healing. I like adding a few drops of Natural E-Oil to my skincare products to keep skin looking healthy.
Rose Hip Seed Oil
Pure rose hip seed oil is rich in omega-6 fatty acids and supports skin renewal. A few drops worked into your cuticles can help restore and nourish the nail bed.
Choice of carrier oils: Jojoba, Sweet Almond, Coconut, or Avocado
Any of these make a great base—deeply restorative for dry, irritated skin and brittle nails.
You can also add a few drops of your favorite essential oils* for added benefits and a pleasant natural scent. Always dilute essential oils with a carrier oil like jojoba, coconut, grapeseed, olive, avocado, or almond oil before applying. My favorite essential oils for nail and cuticle treatments are:
Frankincense
Lavender
Lemon
Eucalyptus
Tea Tree
NOW® essential oils are the only brand I use. They’re high quality, rigorously tested, and very affordable. You can find them at nowfoods.com, on Amazon, and at some local stores.
*Caution: NOW® Essential Oils are highly concentrated and can irritate the skin. Avoid direct contact with undiluted oils and always dilute before topical use. Stop use if a rash appears. Not for internal use. Avoid contact with eyes.
Shares: 856

Homemade Moisturizing Nail and Cuticle Oil

Fire up the grill—these teriyaki turkey burgers are packed with flavor and really easy to make, perfect for a weeknight dinner or a backyard BBQ.

Grilling season is in full swing, and this is one of my favorite turkey burger recipes. It’s hard to believe the 4th of July is almost here—summer’s flying by! There’s no better way to celebrate warm evenings than with a big, juicy burger in the backyard. Best of all, everyone loves these—even my picky kids gobble them up every time. They’re a great change from the classic beef cheeseburger.

Teriyaki Turkey Patties with Pineapple Slaw

We’ve been remodeling our kitchen and living without it for the last month and a half, so our grill has been getting a serious workout. I’ve always loved grilling, but this summer I’ve come to appreciate how quick and versatile it is. We’ve tried lots of burger combos, and these teriyaki turkey burgers with pineapple slaw are a favorite.

The teriyaki adds a sweet-and-salty caramelized flavor that gives turkey burgers the extra moisture and taste they often need. I like using ground turkey as a leaner option, but feel free to use beef if you prefer.

Tips for Teriyaki Turkey Burgers
– Use a teriyaki sauce, not a marinade. You can make your own, but I usually grab a store-bought bottle for quick weeknight dinners.
– If you want to be fancy, grill a few thick slices of red onion—grilling removes the bitterness and adds sweet, smoky flavor.
– Divide the meat into 4–5 even patties about 1/2 inch thick. Press a small indentation in the center of each patty with your finger so they cook evenly and don’t puff up.
– Don’t skip the pineapple slaw. It adds great crunch and complements the teriyaki. Fresh pineapple is best, but well-drained canned tidbits work in a pinch (the slaw will be a bit wetter and won’t keep as long with canned fruit). The slaw keeps 2–3 days in the fridge, best within 24 hours for maximum crunch, and it’s also fantastic on fish tacos.
– These burgers can be grilled or pan-fried. Grilling brings extra flavor, but they turn out great in a cast-iron pan during cooler months. Toast the buns on the top shelf of the grill for the last few minutes.

Grilled Teriyaki Turkey Burgers with Pineapple Slaw
Prep time: 5 minutes
Cook time: 10 minutes
Total time: 15 minutes
Servings: 4 burgers

Ingredients
Teriyaki Turkey Burgers
– 1 1/2 pounds ground turkey
– 1/3 cup teriyaki sauce (NOT a marinade) — reserve a few tablespoons for brushing
– 1/2 tablespoon minced garlic
– 1/3 cup panko breadcrumbs
– Sautéed onion slices
– Hamburger buns (Hawaiian buns are great)

Pineapple Slaw
– 12 ounces broccoli slaw
– 1/2 cup chopped pineapple (fresh preferred; if using canned, drain well)
– 1/3 cup Miracle Whip or mayo
– 1/2 tablespoon rice vinegar
– 1/4 cup chopped green onions
– Salt and pepper to taste

Instructions
Teriyaki Burgers
1. Preheat grill to medium-high.
2. Mix all burger ingredients together until combined.
3. Form into 4–5 even patties, about 1/2 inch thick, and press a small indentation in the center of each.
4. Grill on medium-high for 5–6 minutes per side. Brush with reserved teriyaki sauce during the last 1–2 minutes.
5. Top with pineapple slaw and sautéed onions.

Pineapple Slaw
1. Mix all slaw ingredients together well.
2. Chill in the refrigerator and eat within 2 days.

If you try these teriyaki burgers, I’d love to hear what you think!

Did you notice the new update to my blog?
I’m excited to share that I’m an early tester for Google’s Thank with Google pilot program. It lets you buy a virtual sticker to show appreciation for content on my site. There are paid stickers and also free ones, and you can add a short personal message with a paid sticker. All sticker revenue helps support the work that goes into the blog. You can find the Thank with Google feature in a few places on my site—if you try it, I’d love your feedback. As always, thank you for your support!

Spread the love: 1.7K shares