Author

momfad_com

This post is part of a social shopper marketing insight campaign with Pollinate Media Group®, but all opinions are my own. #pmedia #CleanFaceWithEquate http://my-disclosur.es/OBsstV

Spring is nearly here, which means spring and summer travel plans are coming up too. Traveling can be stressful, especially when you have limited packing space and strict rules to follow. One of the hardest parts for me is deciding which toiletries and makeup to bring and how to pack them so nothing breaks or leaks.

How to Pack the Perfect Travel Beauty Bag

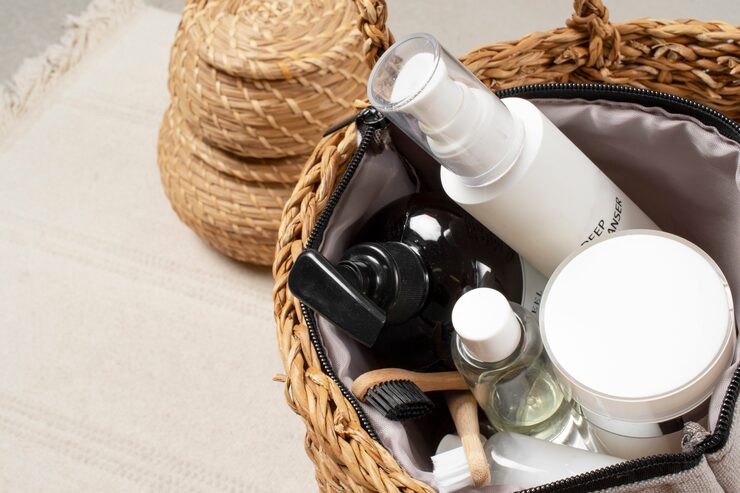
I can’t tell you how many times I’ve arrived somewhere only to open my makeup bag and find a favorite $50 eyeshadow palette smashed or a hair product leaked all over my clothes. It’s the worst. Over the years I’ve learned a few tips to keep your packing organized and your items safe and spill-free.

Use facial towelettes instead of face washes
I love Equate Fragrance Free Makeup Remover Towelettes when I travel. I even keep a pack in my car and gym bag for quick refreshes or nights when I’m too tired for a full skincare routine. When I travel, I try to avoid liquids that might spill. The Equate wipes from Walmart (beauty or cosmetics aisle) are inexpensive (under $5 where I shop) and made with essential oils and 99% natural ingredients. They remove all makeup, even waterproof mascara, and are perfect for wiping down grimy airplane tray tables or sticky toddler hands. Their versatility makes them a must-have.

Make a list
This sounds basic, but without a list I always forget something. A few days before a trip, I write down the beauty products and toiletries I’ll need. I think about the events and activities I’ll be doing and plan my looks from there. Often I take the list into the bathroom while I get ready and add anything I use. Then I check items off when I pack so I don’t forget last-minute things like my toothbrush.

Skip the brushes
I love my makeup brushes, but I usually leave them at home when I travel. Brushes can be bulky and the bristles can get damaged. I use q-tips, sponges, and my fingers to apply makeup on the go.

Pack multi-purpose products
Many beauty items can serve more than one purpose, which is great for saving space. Look for palettes that can do day and night looks. Lipstick can double as blush, and some facial sprays work as setting sprays too.

Limit liquids
TSA rules limit the liquids you can carry, and packing fewer liquids also cuts down the risk of spills and keeps your bag lighter. You can bring a quart-sized bag of liquids, aerosols, gels, creams, and pastes in containers of 3.4 ounces (100 ml) or less. Instead of full-size cleansers, bring wipes. Swap full-size hair products for travel sizes or samples. Skip big perfume bottles and take rollers or samples instead—I have tons from past Ipsy bags.

Use clear bags
I separate dry and liquid items for quick checks. Once I reach my destination, I put everything into a clear makeup bag or plastic bag so I can easily find what I need.

Cushion compacts
There’s nothing worse than opening your bag and finding a crushed compact or palette. To protect compacts and eyeshadows, tuck a few makeup pads or cotton balls between them for extra cushioning.

I’d love to hear your travel tips! What’s your favorite place to travel to?

Spread the love — 107 shares

Stock up on watermelon now—these watermelon-lime slushies will be a summer favorite! They’re icy, refreshing, and perfect for backyard barbecues, pool parties, or lazy afternoons on the patio.

I spotted watermelons all over the grocery store the other day and got so excited. Watermelon is one of my favorite summer treats—sweet, juicy, and best when it’s in season. In our house we eat it all the time: plain (or with a sprinkle of Tajín), grilled, in salads, and my absolute favorite—watermelon-lime slushies.

Summer Refresher: Watermelon-Lime Slushie

Our family loves smoothies and slushies, and these are super easy to make. The two main ingredients are watermelon and lime juice, and a few extra minutes of prep gives you a cold, refreshing drink you’ll want every day. The kids love them, and they turn into great cocktails with a splash of vodka or tequila—add a little triple sec for an extra citrus kick for pool parties.

These slushies are also a smart way to use up watermelon that’s a bit mealy—you won’t notice once it’s blended. The lime adds the perfect bright note. If you want it sweeter, stir in a spoonful of sugar, but I prefer them light with just watermelon and lime. A few mint or basil leaves are a nice touch, too.

Tips before you start: choose seedless watermelon unless you like picking seeds out. I like to cut the watermelon into small chunks and freeze them a few hours in a large bag (reusable silicone bags work great). You don’t have to freeze it—you can add ice—but frozen watermelon makes a thicker, less watered-down slush. When the chunks are frozen, take them out for 5–10 minutes to soften slightly, then blend with lime juice (and liquor if you like) for a thick, delicious slushie.

Watermelon Lime Slushies

Prep time: 10 minutes
Total time: 10 minutes
Servings: 3 drinks

Ingredients
– 4 cups watermelon, cubed and frozen
– Juice of 2 limes
– 1/4 to 1/2 cup water
– 4 oz rum, vodka, or tequila (optional; add a splash of orange liqueur if you like)

Instructions
1. Remove frozen watermelon from the freezer about 10 minutes before making the slushies.
2. Add all ingredients to a blender and blend until smooth.
3. Pour into glasses and garnish with lime and mint.

If you want more refreshing summer drinks, check out my roundup of 12+ best smoothie recipes for summer.

I received complimentary admission to Cedar Point for this post. All thoughts and opinions are my own.

One of my favorite parts of the holidays is creating new family traditions. It’s been so fun building traditions we all look forward to each year, especially as the kids get older.

HalloWeekends at Cedar Point: A New Halloween Tradition

We love Halloween, so this year we finally checked out Cedar Point’s HalloWeekends and had an amazing time. As season pass holders, we visit the park a lot in spring and summer, but this was our first HalloWeekends visit—and it’s definitely going to be an annual tradition for us.

HalloWeekends is the Midwest’s go-to Halloween event, with activities for all ages and scare levels. During the day they run the Tricks and Treats Fall Fest, which includes corn mazes, obstacle courses, crafts, games, trick-or-treating for little ones, and the Tricks and Treats Tasting Tour.

Cedar Point’s rides and roller coasters keep thrill-seekers happy, and the park is decorated with skeletons, monsters, and tons of pumpkins—perfect for photos. At night, parts of the park turn spooky, with haunted attractions and roaming costumed performers that give plenty of fun scares. Since we were there with our kids (ages 5 and 7), we didn’t go through the haunted houses, but we still found plenty to do. I’m planning an adults-only visit next year so we can try everything. Even with their young ages, our kids enjoyed the scare zones—if you want to avoid scares, I share a tip below.

Tips to make your HalloWeekends visit great:
– Visit on less busy days: HalloWeekends can get crowded. If you can, go Thursday evenings, Fridays, or Sundays for smaller crowds.
– Consider VIP or Fast Lane: If you can’t go on a less busy day, look into the VIP Experience or Fast Lane wristbands. VIP includes food and drinks in the VIP Lounge, comfy seating, fires, games, TVs, and Fright Lane or Fast Lane Plus vouchers. Fast Lane wristbands let you skip the line on 18 rides and attractions.
– Try the Tricks and Treats Fall Fest tasting: The food tasting features seasonal sweet and savory options. Tasting cards let you sample treats at different stations and save a little money.
– Dress in layers: Days can be warm and nights cool quickly, so layer up or you’ll end up buying a cute sweatshirt from the gift shop.
– Get a “less scare” necklace if needed: The gift shops sell light-up necklaces that signal staff not to scare kids. We didn’t use them because our kids were fine with scares, but they’re a great option for more cautious little ones.
– Catch the shows: Save time to see the park shows—many are magical and family-friendly. We loved the Witch Sisters’ Spellcasting Ceremony; it’s interactive and fun for kids.
– Stay at or near the park: I recommend staying on-site at Breakers or nearby at Cedar Point Express so you can make the most of your visit. We stayed late and were glad to be at our hotel quickly, and we even explored the park again the next morning.
– Bring a camera: The park’s decorations make for lots of autumn and Halloween photo opportunities.
– Play the games: The Ghoulish Game Zone was a hit with our kids—there are lots of games and every player wins. Our kids left with armfuls of stuffed prizes and huge smiles.

If you love Halloween, I highly recommend visiting Cedar Point HalloWeekends with your family. There was so much to do, and our kids have been talking about it nonstop. Between family-friendly activities, scares for different levels, and plenty of thrill rides, it’s a weekend you won’t forget.

Spread the love

This refreshing pineapple and ginger green smoothie is a family favorite—light, energizing, and packed with nutrients from pineapple, banana, spinach, and a zing of ginger. Even though it’s a green smoothie, you can’t taste the greens, and my kids love it—a great way to sneak in extra veggies.

I usually toss whatever needs using into a smoothie and hope for the best, but green smoothies need a little balance to taste just right. Below is one of my go-to recipes: an energizing pineapple and ginger smoothie that’s easy to make and delicious.

Zesty Pineapple and Ginger Green Smoothie

Green smoothies are a quick, convenient way to add more greens to your diet. I often make them for a healthy breakfast since they pack a lot of nutrients and superfoods into one drink. (If you want more ideas, I’ve shared 12 favorite summer smoothie recipes on the Zulily blog—Green Goddess is a personal favorite.)

Health benefits of green smoothies:
– Fruits and vegetables provide vitamins (like C and A) and antioxidants that support the immune system.
– Smoothies keep the fiber from whole fruits and veggies, which helps digestion and keeps you fuller longer compared with juices or sugary drinks.
– Greens are rich in chlorophyll, which may help detoxify, improve skin glow, and boost energy.

With the right mix of fruit and greens, green smoothies can taste amazing. My whole family enjoys them, including my kids, so they’re an easy way to add extra vegetables to our diets.

Tips for making the best green smoothies:
– Use a strong blender that blends everything smoothly.
– Balance is key: try 1 cup greens, 1 cup liquid, and 1 cup fruit for a good mix of sweetness and nutrition.
– Choose healthy liquids as your base, such as nut milk, oat milk, water, or coconut milk.
– Add healthy fats like nuts, seeds, avocado, or a little coconut oil to help your body absorb nutrients.
– Boost with protein powder, spices (cinnamon, ginger), or superfoods (collagen, ashwagandha, maca, hemp hearts).
– Blend greens with the liquid first to avoid leafy chunks, then add fruit and blend again.
– Skip ice—use frozen fruit so the smoothie won’t get watered down.
– Prep ahead by chopping fruits and vegetables and freezing them in reusable bags. When you’re ready, just add to the blender with your liquid.

Energizing Pineapple and Ginger Green Smoothie
This bright, citrusy smoothie gets a lively kick from ginger. Pineapple adds sweetness, vitamin C, and bromelain (an anti-inflammatory enzyme), while ginger supports digestion and the immune system. Start with a small amount of ginger and add more if you like a stronger taste.

Prep time: 5 minutes
Total time: 5 minutes

Ingredients:
– 1 1/2 cups pineapple (fresh or frozen)
– 1 small banana, frozen
– 1 cup packed fresh spinach
– 1/2 cup Greek yogurt
– 1/2 inch ginger
– 3/4 cup milk or water
– Maple syrup (optional, for extra sweetness)

Instructions:
1. Add spinach, ginger, and liquid to the blender and blend until smooth.
2. Add the remaining ingredients and blend until fully smooth.

Share the love — 6 Shares

Looking for a quick, protein-packed meal? This Spinach, Tomato, and Feta Frittata is a one-pan wonder that comes together fast and works for breakfast, brunch, or a light dinner.

A family favorite, this frittata looks fancy but is incredibly simple and so tasty. I make frittatas when I want a quick, protein-filled meal with lots of veggies that keeps you full. They’re easy to make ahead and reheat well—even good served cold. If you don’t love the veggies listed, feel free to swap them for your favorites.

Frittata with Spinach, Tomato and Feta

Why you’ll love it:
– Quick and simple: Minimal prep and cook time, great for busy nights.
– High in protein: Eggs and feta help keep you satisfied.
– Flexible: Add your favorite veggies or proteins like mushrooms, peppers, or ham.
– Delicious: A tasty mix of spinach, tomatoes, and feta.
– Cast-iron finish: Cooking in a cast-iron skillet gives a lovely crust and a subtle flavor boost.

The secret that makes the best frittata
Adding plain Greek yogurt keeps the frittata creamy and prevents it from getting rubbery. It adds moisture and a light, fluffy texture—plus a little extra protein.

Why use cast iron?
– Even heat: Cast iron cooks the frittata through evenly.
– Crispy crust: The skillet gets very hot for a nice browned edge.
– Flavor boost: It adds a subtle, unique depth to the dish.
– Built to last: A good cast-iron skillet can last for years with care.
– Extra iron: Cooking in cast iron can add some iron to your food. The exact amount depends on the food and cooking time. I like a Lodge cast-iron skillet for everyday use.

Tips & variations:
– Add-ins: Try chopped mushrooms, diced peppers, onions, or diced ham or sausage.
– Spice it up: Sprinkle red pepper flakes for heat.
– Make ahead: Refrigerate after cooking and reheat gently in a skillet or oven.

Spinach, Tomato, and Feta Frittata

Prep time: 10 minutes
Cook time: 20 minutes
Total time: 30 minutes
Serves: 4

Ingredients:
– 1 tbsp avocado, corn, or olive oil
– 1 cup plain Greek yogurt (2%), e.g., FAGE Total
– 8 eggs
– 2–3 cloves garlic, minced
– 2 cups packed spinach, roughly chopped
– 1/4 cup parsley, chopped
– 1/2 cup feta cheese
– 1–2 large tomatoes, thinly sliced

Instructions:
1. Preheat the oven to 375°F.
2. Whisk the eggs in a medium bowl, then stir in the Greek yogurt until smooth.
3. Heat the oil in a cast-iron or other oven-safe skillet over medium heat. Add the garlic and spinach and sauté until the spinach begins to wilt.
4. Pour the egg mixture into the pan. Stir in the feta and parsley. Cook for a few minutes, gently shaking the pan now and then, until the edges start to set. Remove from heat.
5. Top with the sliced tomatoes and transfer the pan to the oven. Bake about 20 minutes, or until set and puffed.

This Spinach, Tomato, and Feta Frittata is a healthy, satisfying meal any time of day. Enjoy!

Share this recipe.

The holiday season is here — a time for laughter, joy, and time with loved ones. With all the gatherings and celebrations, it’s important to keep our health a priority. As we prepare for the festivities, let’s double-check our wellness habits so we can enjoy a happy, healthy holiday season.

This post is sponsored by I Vaccinate. All thoughts and opinions are my own.

A Family Checklist for a Healthy Holiday

Healthy Holiday Checklist:

Hand Hygiene
Teach the whole family to wash hands often with soap and water for at least 20 seconds, especially before meals and after being in public. Make washing up a routine when you come home from errands or school. When you’re out, keep hand sanitizer handy and use it as soon as you get back in the car.

Vaccine Check-Up
Make time to see your healthcare provider or visit a clinic to make sure everyone’s vaccines are up to date, including any boosters. Don’t forget the flu shot — it’s especially important in colder months. National Influenza Vaccination Week runs December 4–8, a reminder that anyone 6 months and older can still get a flu vaccine this season.

Keeping vaccinations current is one of the easiest and most effective ways to prevent illness. Recent MDHHS data shows only 66.1% of children aged 19 to 36 months have finished the recommended primary vaccine series — the lowest rate in Michigan since 2020. That leaves many children at risk and weakens community protection (public health experts generally say a 70% vaccination rate is the minimum for basic community protection).

Protecting my children and loved ones is my top priority. Staying on the CDC-recommended immunization schedule helps protect kids and teens from 16 vaccine-preventable diseases. This schedule has been carefully tested and reviewed by medical experts, and vaccines are safe and effective at preventing disease and outbreaks. For more on vaccine safety and importance, visit iVaccinate.org.

Healthy Eating Habits
Enjoy holiday treats, but try to keep meals balanced. Alongside desserts, include fruits, vegetables, lean proteins, and whole grains. Keep healthy snacks ready — like cut fruit, veggies with dip, nuts, or jerky — so you can fill up on nutrient-rich foods as well as seasonal favorites.

Stay Active, Stay Merry
Keep moving together! Add physical activities to your holiday plans: a post-dinner walk, a family game, sledding, hiking, or a dance-off to holiday music. Staying active supports physical and mental well-being, and fresh air is a natural mood booster.

Mindful Moderation
Enjoy treats mindfully. Encourage smaller portions and savor each bite. It’s not about denying yourself, but finding balance and enjoying the season’s flavors.

Enough Rest and Relaxation
Amid the busyness, make sleep and downtime a priority. Keep a bedtime routine so everyone gets the rest they need. Good sleep helps your body and mind recover and feel their best.

Holiday Stress-Busters
Find ways to manage stress with deep breathing, short meditations, or activities that relax you. Talk openly with family about worries, take breaks when needed, and delegate tasks to lighten the load.

Prioritize Mental Health
Support each other and keep communication open. If holiday stress or emotional challenges become too much, consider professional help or counseling.

Spread Cheer, Not Germs
Practice good respiratory etiquette: cover coughs and sneezes with a tissue or your elbow. If you’re sick, please stay home — no one wants the gift of germs this season.

The holidays are a time for celebration and gratitude, and for taking care of ourselves and those we love. By putting health and wellness first, everyone can enjoy the season safely. Wishing you a safe, healthy, and joyful holiday season!

Spread the love

This post is sponsored by Barilla®. All thoughts and opinions are my own.

This pasta comes together easily and makes a perfect quick weeknight meal—thanks to the star of the dish, Barilla® Red Lentil Spaghetti. The sauce is centered on deeply roasted tomatoes and garlic for a rich, flavorful meal the whole family will enjoy.

Barilla® Red Lentil Spaghetti with Roasted Tomato and Garlic

Pasta is almost always a win. One simple health-and-mom trick I love is swapping regular pasta for legume pasta. Barilla® offers two legume varieties in several shapes: Red Lentil Spaghetti and Chickpea. Both are made from a single ingredient—red lentil or chickpea flour—so they add plant-based protein and fiber to meals. They cook to a perfect al dente every time, and Barilla® Red Lentil Spaghetti was even a 2021 People Food Awards winner.

With fall coming, I love all the fresh produce—pulling tomatoes from the garden or lingering at the farmers market. Cooking seasonally matters to our family; I like using ingredients when they’re at their best.

This roasted tomato and garlic pasta is simple and so satisfying. It becomes a weeknight staple in late summer and early fall because it takes little prep and can be ready in about 35 minutes. Our weeknights are busy with kids coming home, work, and activities, so quick, tasty meals are a must.

I use Barilla® Red Lentil Spaghetti for this recipe. It’s certified gluten-free, Non-GMO Project Verified, and made with one ingredient: red lentil flour. It pairs well with tomato, chunky vegetable, or meat sauces, and the noodles soak up the flavors for a perfect bite. You can find Barilla® Legume Pasta at Meijer in the pasta aisle.

The sauce is Mediterranean-inspired—roasted tomatoes and garlic, a good drizzle of olive oil, and finished with fresh parmesan and ribboned basil. Roasting tomatoes brings out deep, sweet flavors and is one of my favorite ways to use lots of tomatoes. If you’d like, add grilled chicken, baked tofu, or shrimp at the end. This dish is flexible—roasted zucchini or red peppers would be great, too.

How to roast tomatoes and garlic
Roasting tomatoes and garlic is easy and addictive. Use a high oven temperature—about 425°F—to get deep flavor without burning or drying them out.

– Tomatoes: Line a large baking sheet with parchment. I prefer cherry tomatoes, but you can use larger ones—just halve them and place cut-side up. Drizzle generously with olive oil, season with salt and pepper, and roast 30–35 minutes until nicely browned.
– Garlic: Cut the top off each garlic head to expose the cloves, drizzle with olive oil, and wrap in foil (or parchment tied with twine). Roast alongside the tomatoes for 30–35 minutes until soft. Be careful when opening—the steam is hot. Roasting removes bitterness and gives a rich, mellow garlic flavor.

When the pasta is cooked and the garlic has cooled a bit, squeeze the roasted garlic cloves out—they’ll slip out easily and mash into a paste that blends into the sauce.

Roasted Tomato and Garlic Pasta with Barilla® Red Lentil Spaghetti
This simple pasta is perfect for weeknights. Roasted tomatoes and garlic make a flavorful sauce, finished with fresh basil and parmesan.

Prep time: 5 minutes
Cook time: 30 minutes
Total time: 35 minutes
Servings: 4

Ingredients
– 1 1/2 to 2 pounds tomatoes (cherry preferred; if using larger tomatoes, halve them)
– 2 heads garlic
– 1 box Barilla® Red Lentil Spaghetti
– Olive oil
– Large handful fresh basil, sliced into ribbons
– 1/3 cup parmesan flakes
– 1/4–1/2 cup reserved pasta water
– Salt and pepper

Instructions
1. Preheat oven to 425°F. Line a large baking sheet with parchment.
2. Arrange tomatoes on the baking sheet (if using larger tomatoes, place them cut-side up). Drizzle generously with olive oil and season with salt and pepper.
3. For the garlic, cut the top half off each head to expose the cloves. Place each head on a square of foil or parchment, drizzle with olive oil, and wrap tightly.
4. Roast tomatoes and garlic together for 30–35 minutes, until the tomatoes are deeply roasted and the garlic is soft.
5. Cook Barilla® Red Lentil Spaghetti according to the box directions, aiming for al dente. Reserve about 1/4 cup pasta water (keep more if you like a looser sauce).
6. In a large bowl, combine the pasta, roasted tomatoes, roasted garlic (squeeze the cloves out into the bowl), and half the basil. Mix well. Add a drizzle of olive oil or some reserved pasta water to loosen the sauce if needed. Season with salt and pepper to taste.
7. Before serving, add any protein if desired. Garnish with remaining basil and parmesan.

Hey home decor fans! Struggling to find the perfect spot for your favorite artwork? We’ve all been there. Let’s talk about how to hang wall art so it looks balanced and transforms your space.

We’re finally at the fun part of our home project—decorating the finishing touches! We just finished a wallpaper project in our son’s room using Photowall murals (you can see it here) and loved the result. When it came time to add artwork, we ordered from Photowall again. They have tons of prints and customization options—wall murals, canvases, prints, and posters—so it was easy to find pieces that fit our space.

Find the Perfect Height to Hang Your Pictures — Let’s Hang!

Now it’s time to hang everything. Here are my favorite tips for getting the best look.

The “eye-level” idea: Are we all the same height?
People often say to hang art at eye level, but everyone’s eye level is different. Instead, pick a height that works for your household—a middle ground that’s not too high or too low.

The Goldilocks rule: Not too high, not too low
Think Goldilocks. You want your art at a “just right” height—high enough to see comfortably, but not so high you need a ladder. A good rule of thumb is about 57 to 60 inches from the floor to the center of the artwork. That usually feels right for most people.

Grouping art: Treat the cluster as one piece
If you’re creating a gallery wall, think of the whole group as one big artwork. Find the group’s center and measure from there. Mix frame sizes and styles for interest, but keep everything within a defined area so it still feels balanced.

Tools: Measuring tape and patience
Before you hammer a nail, grab a measuring tape, pencil, and level. Measure twice, mark your spot, and step back to see how it looks before you commit.

When to break the rules
Rules are helpful, but breaking them can be exciting. Try hanging a statement piece above a doorway or create a dramatic floor-to-ceiling arrangement. When you break the rules on purpose, you can end up with something amazing.

In short: hang loose, hang right
With the Goldilocks approach, a little creativity, and a trusty measuring tape, you’ll be ready to create a display that shows off your style. Go hang those pieces with confidence—your wall, your rules, your story. Happy decorating!

Photowall gave me a coupon code for 20% off plus free shipping at photowall.com. Use code: mgh20.

Spread the love

This post is sponsored by NOW Foods. All opinions are my own.

Enjoy the taste of fall with these apple crisp crumble bars. They’re made with wholesome ingredients—fresh apples, pecans, oats, and coconut oil—so you get a soft cinnamon apple filling topped with a crunchy oat crumble. The result is a cozy, satisfying treat.

Crispy Apple Crumble Bars

Fall is my favorite season for cooking. I love summer grilling, but autumn brings the hearty, comforting flavors I crave—think soups, roasted vegetables, and rich desserts. Apple picking is a family tradition for us, so I’m always looking for tasty ways to use up crisp apples. Apple crisp is a classic favorite, and these healthier crumble bars give you that same cinnamon-apple goodness in a lighter, grab-and-go form.

These bars are vegan and gluten-free and use mostly pantry staples like NOW Foods Rolled Oats, NOW Foods Coconut Oil, and NOW Foods nuts (I prefer pecans, but walnuts work well, too) along with brown sugar, cinnamon, and nutmeg. I’ve trusted NOW Foods for years for quality pantry items and whole foods. They test ingredients for purity and are transparent about their sourcing. If you’d like to try their products (they offer natural foods, essential oils, supplements, beauty items, and more), use code AMBER for 20% off at NOWFoods.com.

These bars have an oatmeal crust that’s chewy and a thick apple-cinnamon filling, finished with a crumbly oat and pecan topping. Serve them warm or cooled—warm bars are a bit more crumbly, while fully cooled bars are easier to cut and hold their shape. They’re perfect for dessert or to tuck into a lunchbox, and they’re delicious with vanilla ice cream or frozen yogurt.

Below is the recipe plus notes on simple swaps and adjustments.

Substitution notes and tips:
– I use oat flour instead of regular flour for more fiber. The recipe shows how to make oat flour from the oats you set aside. If you already have oat flour, use that and skip the extra step.
– You can swap coconut sugar for brown sugar, though coconut sugar can make the bars slightly drier; I prefer brown sugar for a richer flavor.
– If you don’t have coconut oil, use unsalted butter 1:1.
– To reduce sweetness, omit the 2 tablespoons of brown sugar in the apple filling.

Apple Crisp Crumble Bars
Prep time: 15 minutes
Cook time: 40 minutes
Total time: 55 minutes
Yields: 9 bars

Ingredients
Crust and crumb topping
– 2 1/2 cups rolled oats, divided (1 cup and 1 1/2 cups)
– 1/2 cup coconut oil, room temperature
– 1/3 cup brown sugar (or coconut sugar)
– 1/4 teaspoon salt
– 4 tablespoons pecans or walnuts

Apple pie filling
– 3 1/2 cups apples, peeled and diced or sliced
– 1 teaspoon cinnamon
– Pinch of nutmeg
– 1 teaspoon vanilla extract
– 1/4 cup water
– 1 tablespoon cornstarch
– 1 teaspoon lemon juice
– 2 tablespoons brown sugar

Instructions
1. Preheat oven to 350°F. Line an 8×8-inch pan with parchment paper and spray lightly with oil.

Apple filling
2. Combine all filling ingredients in a medium saucepan. Cook over low to medium heat for about 10 minutes, stirring occasionally, until the mixture thickens and the apples start to soften. Remove from heat.

Crust and topping
3. Place 1 cup of the oats in a food processor and blend until fine to make oat flour.
4. Add the remaining 1 1/2 cups oats, coconut oil, 1/3 cup brown sugar, salt, and nuts to the oat flour in the processor. Pulse several times until mixed but still slightly chunky—you want a coarse, crumbly texture. Don’t over-process.
5. Reserve 1 cup of this oat mixture for the topping.
6. Press the remaining oat mixture firmly into the prepared pan to form the crust, working to the edges.
7. Spread the apple filling evenly over the crust.
8. Sprinkle the reserved oat mixture over the apples to form the crumble topping.
9. Bake 40–45 minutes, until the crust is golden brown. Let cool completely before cutting for cleaner slices.

Which do you prefer for fall treats—pumpkin or apple?

Don’t forget to use code AMBER for 20% off at NOWFoods.com.

This post is sponsored by Burt’s Bees, but the content and opinions are my own.
I can’t believe 2020 is almost over and Christmas is right around the corner. I’m finishing up my shopping and the only thing left are stocking stuffers. Every year I do my big shopping early, then panic a few days before Christmas because I forgot the stockings! This year I’m determined to be done early so I can enjoy the season stress-free.
For stocking stuffers I like small, affordable, fun items that actually fit in a stocking. I often choose self-care, beauty, and health products because they’re compact, useful, and a great way to introduce someone to something new. Who doesn’t love a little extra TLC?
Our family has been switching to products with more natural ingredients, so grabbing Burt’s Bees holiday favorites was an obvious choice. I’ve been a Burt’s Bees fan for years and love giving their products as gifts. They use ingredients from nature, don’t test on animals, are responsibly sourced, and use recyclable packaging. It feels good to give skin and lip care that’s gentle on skin, kind to the environment, and made with people in mind. With so many options, gift giving is easy and everyone wins.
I picked up lots of Burt’s Bees stocking stuffers at Walmart on my last grocery run. You can buy them in store or online (Walmart.com offers free shipping on orders over $35). There were plenty of options under $15, so gifting this year is both easy and affordable. The holiday packs include lip care in festive flavors, skincare sets with lotion and lip balm (I love the strawberry set), hand cream trios, and kissable color lip shimmers. There’s something for everyone—women, men, kids, grandparents—at a great price and super convenient to buy at Walmart or Walmart.com.
I grabbed a pack for everyone on my list and know they’ll be used and loved. The kids always go for the lip balms (especially in cold weather) and I’m treating my husband to the ultra-hydrating hand cream trio. I may have sneaked one for myself too—I can’t resist the kissable color products.
Other inexpensive stocking stuffer ideas I love:
– Favorite candy
– Salty snacks: nuts, jerky, trail mix
– Bath loofahs
– Manicure items
– Fun pens or pencils
– Portable phone power bank
– Gum or breath mints
– Face masks
– Card games
– Mini toys for kids (Play-Doh, silly putty, building blocks, slime)
– Magazine
– Phone cases or mounts
– Socks
– Wallets
– Jewelry
– Scrunchies and hair ties
– Reusable makeup pads or wipes
Don’t forget to pick up Burt’s Bees at Walmart or walmart.com.
What are your favorite stocking stuffers? Which Burt’s Bees holiday pack would you want in your stocking?
Spread the love
31 Shares

Stocking Stuffers Under $15